Tambourine作業メモ

主にスキル習得のためにやった作業のメモ。他人には基本的に無用のものです。

attr_accessorを自分で実装する

自作クラスでデータを保持しようとしていて半角カナが入ってきて発狂し、絶叫し、半角カナ絶対殺すマンが覚醒した。

といっても、Rubyで半角カナを全角カナに変換するのはとても簡単。NKFを使う。

> irb
irb(main):001:0> require 'nkf'
=> true
irb(main):002:0> a = "いささかプギャーな気分"
=> "いささかプギャーな気分"
irb(main):003:0> NKF.nkf("-Xw", a)
=> "いささかプギャーな気分"

これをセッターに組み込めばいい

require 'nkf'

class MyRecord
  @rec = ""
  
  attr_reader :rec
  
  def rec=(str)
    @rec = NKF.nkf("-Xw", str)
  end
end

r = MyRecord.new

r.rec = "いささかプギャーな気分"

p r.rec # => "いささかプギャーな気分"

問題ない。しかし、フィールドは1つではないかもしれない。 3つあったらこうなるだろう。

class MyRecord
  @rec1 = ""
  @rec2 = ""
  @rec3 = ""
  
  attr_reader :rec1, :rec2, :rec3
  
  def rec1=(str)
    @rec1 = NKF.nkf("-Xw", str)
  end
  
  def rec2=(str)
    @rec2 = NKF.nkf("-Xw", str)
  end
  
  def rec3=(str)
    @rec3 = NKF.nkf("-Xw", str)
  end
end

半角カナ絶対殺すマンは転生し、絶対DRY星人として蘇った。

さて、どうするか。こんな感じに出来ればいいのだろう。

class MyRecord
  @rec1 = ""
  @rec2 = ""
  @rec3 = ""
  
  my_attr :rec1, :rec2, :rec3
end

my_attrはMyRedordクラスのクラスメソッドとして定義してやればいい。 Rubyist人生で初めてinstance_variable_setを使った。

require 'nkf'

class MyRecord
  def self.my_attr(*name)
    attr_reader *name
    name.each do |n|
      define_method("#{n.to_s}=") do |str|
        instance_variable_set(
          "@#{n.to_s}".to_sym,
          NKF.nkf("-Xw", str)
        )
      end
    end
  end
  
  @rec1 = ""
  @rec2 = ""
  @rec3 = ""
    
  my_attr :rec1, :rec2, :rec3
end

r = MyRecord.new

r.rec3 = "いささかプギャーな気分"

p r.rec3 # => "いささかプギャーな気分"
treeコマンド

treeコマンドは、たまーに欲しくなる。 プロジェクトの共有ディレクトリの使い方を説明するととかに。

Macにはない。Homebrewで入れれば良いらしい

> brew install tree
==> Downloading https://homebrew.bintray.com/bottles/tree-1.8.0.mojave.bottle.ta
######################################################################## 100.0%
==> Pouring tree-1.8.0.mojave.bottle.tar.gz
🍺  /usr/local/Cellar/tree/1.8.0: 8 files, 117KB

試して見る

> ls
納品      課題      成果物
> tree
.
├── ?\215?\223\201
├── 課?\214
└── ?\210\220?\236\234?\211?

3 directories, 0 files

おおぅ。-Nが必要らしい

> tree -N
.
├── 納品
├── 課題
└── 成果物

3 directories, 0 files

絶対忘れるので、aliasを設定しておく

> alias tree "tree -N"
> tree 
.
├── 納品
├── 課題
└── 成果物

3 directories, 0 files

fishのaliasは、実体としては関数定義。なので、関数を保存する必要がある。

> funcsave tree

確認してみよう

> functions
., :, N_, abbr, alias, bg, cd, cdh, contains_seq, delete-or-exit, dirh, dirs,
disown, down-or-search, edit_command_buffer, eval, export, fg,
fish_breakpoint_prompt, fish_clipboard_copy, fish_clipboard_paste, fish_config,
fish_default_key_bindings, fish_default_mode_prompt, fish_fallback_prompt,
fish_hybrid_key_bindings, fish_indent, fish_key_reader, fish_md5,
fish_mode_prompt, fish_opt, fish_print_hg_root, fish_prompt,
fish_sigtrap_handler, fish_title, fish_update_completions, fish_vi_cursor,
fish_vi_key_bindings, fish_vi_mode, funced, funcsave, grep, help, history,
hostname, isatty, kill, la, ll, ls, man, nextd, nextd-or-forward-word, open,
popd, prevd, prevd-or-backward-word, prompt_hostname, prompt_pwd, psub, pushd,
pyenv, rbenv, realpath, seq, setenv, string, suspend, trap, tree, type, umask,
up-or-search, vared, wait,
> functions tree
# Defined in - @ line 1
function tree --description 'alias tree tree -N'
    command tree -N $argv;
end
> 

OCamlでコマンドライン引数を処理する

さて、次はファイル名や表示行数を指定できるように修正しよう。

引数は、Cのargv相当がSys.argvに入ってくるが、自分でパースするのはめんどうだ。 もちろん、標準ライブラリでパースできる。Argモジュールを使う。

以下の手順を踏む。

  1. 引数で指定された情報を格納する参照を定義する
  2. どんな引数がくるのか、定義を作る
  3. パースする

詳しいことは、 http://caml.inria.fr/pub/docs/manual-ocaml/libref/Arg.html を読む。 手順2のanon_funに何を指定するのかわかりにくいが、要するにフラグ無しの引数の扱いを指定すればいい。

tail -n 5 filename に対応したかったら、

let n = ref 5 (* 表示する行数 *)
let inputfile = ref ""

let spec = [("-n", Arg.Set_int n, "Number of lines")]
let () = Arg.parse spec (fun s -> inputfile := s) ""


(* ファイルを全行読み込む *)
let fi = open_in !inputfile

let lines = 
  let lst = ref [] in
  let eof = ref false in 
  while not !eof do
    try lst := !lst @ [(input_line fi)] with End_of_file -> eof := true
  done;
  !lst

let () = close_in fi


(* 行のリストの最後n行だけ取り出す*)
let rec tail lst = match lst with
    [] -> [] 
  | first :: rest -> 
    let last = tail rest in
    if List.length last > !n - 1  then last else first :: last 

let () = List.iter print_endline (tail lines)

これでOK。以外とバリバリrefを使うのである(笑)。

OCamlでナイーブなtailを作る

プログラミングの基礎 ((Computer Science Library))を読み終わった。それなりに面白かった。正直、赤黒木とかちゃんと理解するのは普通に難しいので飛ばし読みしたけど。昔、一度理解はしたけど、実装しろと言われたらもう一度勉強し直さないとどうにもならないだろうなあ。

さて、OCamlをざっと理解した気になったので、Goと同じプログラムをOCamlで作ってみることにしよう。先ずは、tailが作れないことには話にならない。

とはいえ、教科書にファイルの読み書きは出てこないのだった(笑)。副作用のある処理はオマケ扱いだ。

標準出力への書込が出来ないと何が正しいのかさっぱりわからないので、Hello Worldから行こう。

> cat tail.ml
let () = print_endline "Hello, OCaml!"
> ocamlopt -o my_tail tail.ml 
> ./my_tail 
Hello, OCaml!

ocamloptコマンドは、ネイティブバイナリを作ってくれる。

さて、ファイルを読み込んでみよう。コマンドライン引数の処理方法をまだ知らないので、読み込むファイルは固定にする。

open_inでファイルを開き、input_lineで読む。 EOFまで読むと例外になるので、それをキャッチして読込を止める。とても命令型な処理になる。 教科書が何にも役に立たない(笑)。

let fi = open_in "./sample.memo"

let lines = 
  let lst = ref [] in
  let eof = ref false in 
  while not !eof do
    try lst := !lst @ [(input_line fi)] with End_of_file -> eof := true
  done;
  !lst

let () = close_in fi

let () = List.iter print_endline lines

whileを使ってファイルを読むところは、mutableなlstやモードを持つeofが出てきて全然functionalじゃない。がっかりだ。

とりあえず、これでcatコマンド相当だ。

tailにするには、listの後ろを取り出す。実は後ろを取り出すのは、再帰だと簡単だ。 こんな関数で出来る。

let n = 5
let rec tail lst = match lst with
    [] -> [] 
  | first :: rest -> 
    let last = tail rest in
    if List.length last > n - 1  then last else first :: last 

これで後ろの5行が取り出せることになる。

GoでMarkdownをHTMLにする

OCamlに浮気していたけど、golang版の議事録作成ツールの最後のピースとして、Makdownの変換部分について調べてみる。

Markdownの変換は標準ライブラリでは出来ない。外からライブラリを持ってくるときにはGOPATHが大事になるらしいが、 それも過去のことらしい。良くわからない。

最新のやり方に従うため、Software-Design 2019/05の特集記事を参考に、go mod initする。

> go mod init fmt_session_memo
go: creating new go.mod: module fmt_session_memo

fmt_session_memo というのはこれから作ろうとしているコマンドの名前である。

これをすると、go.modというファイルが作られる。

> cat go.mod
module fmt_session_memo

go 1.12

Markdownのライブラリはblackfridayというのを使うことにする。go getすればいいらしい。 Markdown記法で書かれたものをHTMLに変換するGo言語コード を参考にした。

> go get github.com/russross/blackfriday
go: finding github.com/russross/blackfriday v2.0.0+incompatible
go: downloading github.com/russross/blackfriday v2.0.0+incompatible
go: extracting github.com/russross/blackfriday v2.0.0+incompatible
go: finding github.com/shurcooL/sanitized_anchor_name v1.0.0
go: downloading github.com/shurcooL/sanitized_anchor_name v1.0.0
go: extracting github.com/shurcooL/sanitized_anchor_name v1.0.0

go.modが修正された。

> cat go.mod
module fmt_session_memo

go 1.12

require (
    github.com/russross/blackfriday v2.0.0+incompatible // indirect
    github.com/shurcooL/sanitized_anchor_name v1.0.0 // indirect
)

go.sumってのも出来た。

> cat go.sum
github.com/russross/blackfriday v2.0.0+incompatible h1:cBXrhZNUf9C+La9/YpS+UHpUT8YD6Td9ZMSU9APFcsk=
github.com/russross/blackfriday v2.0.0+incompatible/go.mod h1:JO/DiYxRf+HjHt06OyowR9PTA263kcR/rfWxYHBV53g=
github.com/shurcooL/sanitized_anchor_name v1.0.0 h1:PdmoCO6wvbs+7yrJyMORt4/BmY5IYyJwS/kOiWx8mHo=
github.com/shurcooL/sanitized_anchor_name v1.0.0/go.mod h1:1NzhyTcUVG4SuEtjjoZeVRXNmyL/1OwPU0+IJeTBvfc=

チェックサムが入ってる

後はblackfriday.MarkdownBasic()を使えばいいらしい・・・と思ったら、そんな関数ないと言われる。 GitHubを観に行くと、V2はRunを使えと書いてある。

str := string(blackfriday.Run(md))

これで出来た。

utopを使う

プログラミングの基礎 ((Computer Science Library)) というタイトルからは想像つかないことに、この本を読んでOCamlを勉強している。 本当に最初に関数型言語でプログラムを勉強した人は、どんなプログラマーに育つのだろうか。

OCamlocamlコマンドでREPL環境が提供されるのだが、ヒストリーが効かない。 ついキーボードの矢印キーの上を入力して、こうなる

> ocaml
        OCaml version 4.07.1

# 1 ;; 
- : int = 1
# ^[[A     (* ←ここで上を入れた *)

がっかりだ。

いろいろチェックしてみると、OPAMで入れられるパッケージにREPLを提供するモノがあるらしい。 以下の記事を参考にした。

OCaml の環境構築 - Qiita

インストールしてみる。

> opam install utop
The following actions will be performed:
  ∗ install conf-m4     1          [required by ocamlfind]
  ∗ install dune        1.9.1      [required by utop]
  ∗ install seq         base       [required by lwt]
  ∗ install ocamlbuild  0.14.0     [required by react]
  ∗ install ocamlfind   1.8.0      [required by utop]
  ∗ install mmap        1.1.0      [required by lwt]
  ∗ install jbuilder    transition [required by cppo, camomile, lambda-term]
  ∗ install base-bytes  base       [required by zed]
  ∗ install result      1.3        [required by lwt]
  ∗ install cppo        1.6.5      [required by utop]
  ∗ install camomile    1.0.1      [required by utop]
  ∗ install topkg       1.0.0      [required by react]
  ∗ install lwt         4.2.1      [required by utop]
  ∗ install react       1.2.1      [required by utop]
  ∗ install lwt_log     1.1.0      [required by lambda-term]
  ∗ install zed         1.6        [required by lambda-term]
  ∗ install lwt_react   1.1.2      [required by utop]
  ∗ install lambda-term 1.13       [required by utop]
  ∗ install utop        2.3.0
===== ∗ 19 =====
Do you want to continue? [Y/n] y

<><> Gathering sources ><><><><><><><><><><><><><><><><><><><><><><><><><><>  🐫 
[cppo.1.6.5] downloaded from cache at https://opam.ocaml.org/cache
[lambda-term.1.13] downloaded from cache at https://opam.ocaml.org/cache
[dune.1.9.1] downloaded from cache at https://opam.ocaml.org/cache
[lwt.4.2.1] downloaded from cache at https://opam.ocaml.org/cache
[lwt_log.1.1.0] downloaded from cache at https://opam.ocaml.org/cache
[mmap.1.1.0] downloaded from cache at https://opam.ocaml.org/cache
[camomile.1.0.1] downloaded from cache at https://opam.ocaml.org/cache
[lwt_react.1.1.2] downloaded from cache at https://opam.ocaml.org/cache
[ocamlbuild.0.14.0] downloaded from cache at https://opam.ocaml.org/cache
[react.1.2.1] downloaded from cache at https://opam.ocaml.org/cache
[result.1.3] downloaded from cache at https://opam.ocaml.org/cache
[ocamlfind.1.8.0] downloaded from cache at https://opam.ocaml.org/cache
[topkg.1.0.0] downloaded from cache at https://opam.ocaml.org/cache
[zed.1.6] downloaded from cache at https://opam.ocaml.org/cache
[utop.2.3.0] downloaded from cache at https://opam.ocaml.org/cache

<><> Processing actions <><><><><><><><><><><><><><><><><><><><><><><><><><>  🐫 
∗ installed conf-m4.1
∗ installed ocamlfind.1.8.0
∗ installed base-bytes.base
∗ installed seq.base
∗ installed ocamlbuild.0.14.0
∗ installed dune.1.9.1
∗ installed jbuilder.transition
∗ installed mmap.1.1.0
∗ installed result.1.3
∗ installed cppo.1.6.5
∗ installed topkg.1.0.0
∗ installed lwt.4.2.1
∗ installed react.1.2.1
∗ installed lwt_log.1.1.0
∗ installed lwt_react.1.1.2
∗ installed camomile.1.0.1
∗ installed zed.1.6
∗ installed lambda-term.1.13
∗ installed utop.2.3.0
Done.

<><> jbuilder.transition installed successfully <><><><><><><><><><><><><><>  🐫 
=> Jbuilder has been renamed and the jbuilder package is now a transition package. Use the dune
   package instead.
# Run eval (opam env) to update the current shell environment

便利じゃの。

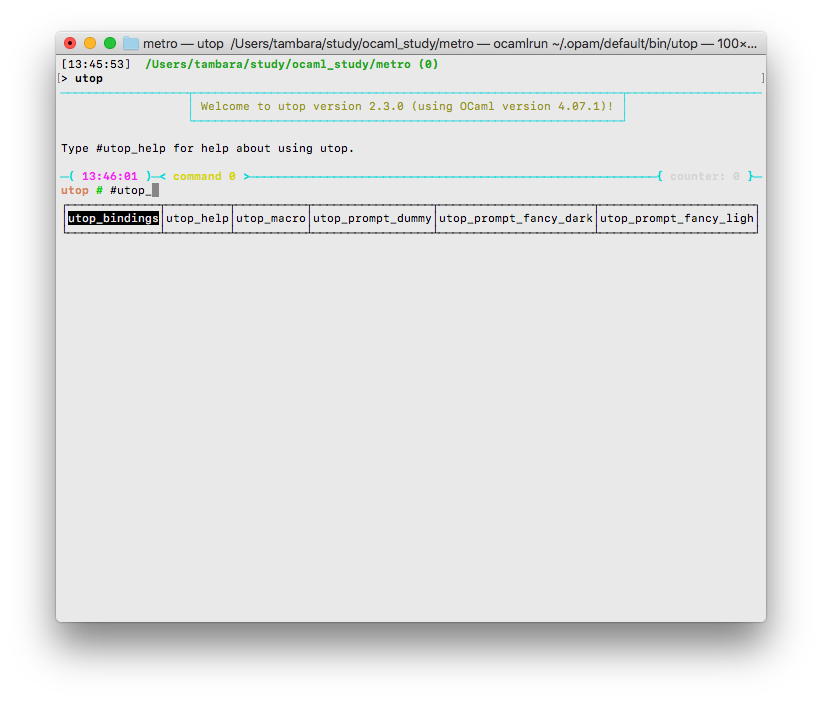
どういう意味があるのかわからないままeval (opal env)を実行し、さっそく起動してみる。

f:id:Tambourine:20190430134702p:plain

な、なんじゃこら。補完もしてくれるのか。凄いな。でも、utopってコマンド名が覚えられない気がする(笑)。

OCamlのインストール

良い本とあちこちで紹介されている、プログラミングにまったく触れたことがない人向けの入門書を買って読んでみる。

プログラミングの基礎 ((Computer Science Library))

これはお茶の水女子大の理学部情報学科の教科書として書かれた本で、初々しい女子大生たちがこの世界に初めて関わる時に 最初に読むという本である。それをこの道20年近いオサーンである私がなんで手にしたかといえば、 若者に対する教育に興味があることもさることながら、この本が

OCamlの本

だからである。関数型が苦手で、勉強したいとは思っているけどもなかなか身につかない私なのである。

この本は初めてのプログラミング言語としてOCamlを女子大生に教えようとする(そして、ある程度、実績を残している)恐るべき本らしい。ほえー・・・。

というわけで、まずはインストールをしなければなるまい。

https://ocaml.org/docs/install.html を見ると、homebrewで良いとある。一緒にいれるOPAMはOCamlのPackage Managerだそうな。

大人のたしなみとして、まずbrew updateはした上で、brew installする

> brew install ocaml
Updating Homebrew...
==> Downloading https://homebrew.bintray.com/bottles/ocaml-4.07.1.high_sierra.bottle.tar.gz
==> Downloading from https://akamai.bintray.com/d1/d18ce3b54b85ffe8a6ea32c6079fbdfcfdd4cda852b32919a
######################################################################## 100.0%
==> Pouring ocaml-4.07.1.high_sierra.bottle.tar.gz
🍺  /usr/local/Cellar/ocaml/4.07.1: 2,113 files, 237.2MB

> brew install opam
Updating Homebrew...
==> Downloading https://homebrew.bintray.com/bottles/opam-2.0.4.high_sierra.bottle.tar.gz
==> Downloading from https://akamai.bintray.com/36/36febb1c4215e029892bda1fee4ea0414f6694328d286b19f
######################################################################## 100.0%
==> Pouring opam-2.0.4.high_sierra.bottle.tar.gz
==> Caveats
OPAM uses ~/.opam by default for its package database, so you need to
initialize it first by running:

$ opam init

Bash completion has been installed to:
  /usr/local/etc/bash_completion.d

zsh completions have been installed to:
  /usr/local/share/zsh/site-functions
==> Summary
🍺  /usr/local/Cellar/opam/2.0.4: 48 files, 11.3MB

opam initしろと書いているのでしてみる

> opam init
[NOTE] Will configure from built-in defaults.
Checking for available remotes: rsync and local, git.
  - you won't be able to use mercurial repositories unless you install the hg command on your
    system.
  - you won't be able to use darcs repositories unless you install the darcs command on your
    system.


<><> Fetching repository information ><><><><><><><><><><><><><><><><><><><>  🐫 
[default] Initialised

<><> Required setup - please read <><><><><><><><><><><><><><><><><><><><><>  🐫 

  In normal operation, opam only alters files within ~/.opam.

  However, to best integrate with your system, some environment variables
  should be set. If you allow it to, this initialisation step will update
  your fish configuration by adding the following line to ~/.config/fish/config.fish:

    source /Users/tambara/.opam/opam-init/init.fish > /dev/null 2> /dev/null; or true

  Otherwise, every time you want to access your opam installation, you will
  need to run:

    eval $(opam env)

  You can always re-run this setup with 'opam init' later.

Do you want opam to modify ~/.config/fish/config.fish? [N/y/f]
(default is 'no', use 'f' to choose a different file) y
A hook can be added to opam's init scripts to ensure that the shell remains in sync with the opam
environment when they are loaded. Set that up? [y/N] y

User configuration:
  Updating ~/.config/fish/config.fish.

<><> Creating initial switch (ocaml-system>=4.02.3) <><><><><><><><><><><><>  🐫 

<><> Gathering sources ><><><><><><><><><><><><><><><><><><><><><><><><><><>  🐫 

<><> Processing actions <><><><><><><><><><><><><><><><><><><><><><><><><><>  🐫 
∗ installed base-bigarray.base
∗ installed base-threads.base
∗ installed base-unix.base
∗ installed ocaml-system.4.07.1
∗ installed ocaml-config.1
∗ installed ocaml.4.07.1
Done.
# Run eval (opam env) to update the current shell environment

fishまでサポートしてるみたい。私よりfishに詳しいだろうし、お任せする。

起動してみる

> ocaml
        OCaml version 4.07.1

# let a = 1;;
val a : int = 1
# let s = "平成から令和";;
val s : string = "平成から令和"

とりあえず、インタープリタは動いているし、日本語も大丈夫っぽい